Turning Weaknesses Into Strengths
Some of my most rewarding personal growth explorations have involved turning weaknesses into strengths. Nothing proves to me the value of investing in personal growth more than reflecting upon a strength I can leverage with ease and remembering what my life used to be like when I was weak, timid, ignorant, incompetent, or powerless in that same area.
Some skills that I regularly apply today used to be personal weaknesses, especially writing and speaking. I wasn’t naturally good at those skills when I was younger – just the opposite. I committed to improvement over a period of years, and that made a world of difference.
There’s something extra special about applying skills in areas of life that I used to deliberately avoid. For some reason, all the obstacles and limiting beliefs I had to overcome to turn those weaknesses into strengths make it even more fun and rewarding to apply those skills. When I was younger, a stage used to be a scary place. Just visualizing a stage would make me nervous. Now I think of a stage as a high-energy place to connect with people and have fun.
Another rewarding side effect of turning weaknesses into strengths is feeling a lot of love, respect, and admiration for your past self who tackled those weaknesses. Knowing that my past self was able to commit to learning and growth in spite of fear, resistance, obstacles, and setbacks makes me feel a special connection to him. This in turn makes me feel more connected to my future self since my decisions today will determine his strengths and weaknesses. I get to decide which weaknesses he’ll inherit from me and which strengths he’ll be gifted with.
Someday my future self will reflect upon his memories of who I am now, and I want him to remember me with fondness and appreciation. I want him to feel grateful for all the effort I invested into making his life better. I want him to remember how intensely I cared. That’s how I often feel about my past self, and it’s a beautiful feeling. I want to continue weaving that feeling of gratitude and connection throughout the tapestry of my life.
Immersive Deep Dives
Some weaknesses can be tackled little by little in a plodding approach, but my favorite way to tackle a persistent weakness is to do a deep dive. This means committing to some serious progress through action, action, and more action. This usually includes some form of social immersion with like-minded people too. It’s easier to maintain the momentum of a deep dive if you do it with other people.
A deep dive stems from the understanding that the next X years of your life are going to pass anyway, and you can emerge from that time period a stronger and more capable person if you make the right investments in yourself… or you can emerge with your current weaknesses intact. If you don’t commit to the first path, you’re effectively sentencing your future self to keep dealing with the consequences of your weaknesses. Have compassion for your future self, and resolve to make his/her life better.
Deep dives can be fairly short, like spending a few days to research an idea, binge watching a TV show, or doing a 30-day trial. Or they can be much longer, like starting your own business or spending years in Toastmasters.
Not all deep dives have to involve skill-building. While many deep dives are results-focused, some are more experiential or exploratory, such as my recent 30 days of Disneyland.
One of the best ways to get past uncertainty and build clarity is to do some short-term exploratory deep dives. You’ll learn a lot more about what you like and don’t like by diving in and taking action than you will by sitting on the sidelines and pondering what to do. How did you figure out which foods you like? I imagine you figured it out by tasting different foods. You can develop your experiential palate the same way. Whining “I don’t know what to do” is like whining “I don’t know what to eat.” Pick something and go. If you choose wrong, you’ll find out soon enough, and then you can make another choice.
Sometimes I go a little overboard with my deep dives, the Disneyland one being a good example, but I absolutely love all-out immersion. Sometimes the only way I can make progress in a certain area is to commit to a deep dive. Moreover, deep dives can create amazing memories. It’s harder to remember the times when I was flatlining or plodding, but I can vividly recall the periods when I was doing deep dives.
Some goals are accessible enough that just focusing on the right intentions can move you forward. If you get yourself to a place of inner alignment, an easy goal may manifest with relative ease. Other goals are too complex or distant to be LoA’d into submission. The Law of Attraction is like a gravitational field, and the strength of such a field drops off with distance. Strengthening your personal gravity won’t matter much if your goal is on the other side of your experiential galaxy. For those goals you need to launch yourself at the target. Once you get close to your goal, then gravity might come into play, but initially you won’t get anywhere without some serious action.
Addressing the Core Weakness
You’ll often find that your weakness ultimately comes down to something really simple. Within the general weakness, there may be a more specific weakness that’s holding you back. If you can address that one key limitation, the rest of the skill-building process can flow more easily.
My main weakness in speaking was that I didn’t feel comfortable in front of an audience. I felt anxious instead. The stage was a scary place. Once I was finally able to feel comfortable in front of an audience, sans anxiety, speaking became fun and exciting instead of nerve wracking. I could communicate about any topic as my normal self, just as I would during a conversation with a friend. And of course it’s easy to continue practicing the skill after that. But to reach this point, I had to focus on connecting with the audience and caring about the people in the room, not so much on polishing my presentation skills. If I focused on a more corporate style of speaking, it would have taken me much longer to reach my personal tipping point in this area.
My main weakness in writing was that I was never taught how to write from inspiration. When I was in school, I was given some ridiculously uninspired writing projects, like writing an analysis of some of Emily Dickinson’s poetry. Even the so-called creative writing assignments felt uninspired. I largely avoided writing in my early 20s because I associated writing with boredom. Later in life when I discovered how to write from inspiration, I gradually fell in love with writing. Consequently, I wrote a lot more, and I was able to help a lot of people through writing, which made it even more rewarding. To this day I prefer not to write on any set schedule. I write when I’m inspired to write. For me the lack of inspiration was the key weakness that I had to overcome in order to turn this weakness into a strength.
It may take you some time to discover your specific weakness. Sometimes your core weakness won’t be so easy to spot. Try not to jump too quickly into the conclusion that you’ll never be good at some particular skill. It may simply be that the most common ways of building that skill don’t adequately address your specific weakness. For instance, while I found Toastmasters very helpful for skill-building in public speaking, the Toastmasters program itself didn’t really address my core weakness. It gave me lots of opportunity to practice, but just gaining experience wouldn’t have been enough for me. I achieved my biggest breakthroughs by finding speakers who didn’t get nervous at all and learning how their mindset differed from those who did get nervous. The key was that the speakers who got nervous framed speaking as a performance; their role was to impress, entertain, or persuade the audience, which is stressful and not always doable. The ones who didn’t get nervous framed speaking as a conversation; their role was to love the audience and to treat them as friends, which is much less stressful and a lot more fun.
A Deep Dive Example – Making Videos
One personal weakness that I’d love to turn into a strength is making videos.
I have the basic skills needed to record, edit, and share videos online. But one reason I haven’t done many videos is that I didn’t like how they turned out when I filmed them myself. They just don’t look very good to me.
So what’s the core weakness here that holds me back? It could be that I didn’t know anything about video lighting. When I tried to record my own videos, the lighting looked really bad, so I didn’t feel good about the result.
What if I took the time to learn video lighting, and I became semi-competent at it? That would probably make a world of difference. I don’t need amazing production values, but at least if the videos had reasonably good lighting, I’d feel a lot better about creating and sharing them. If I could at least fix that one issue, I could probably make some forward progress in this area.
So I asked myself, What if I did a deep dive to learn how to do decent video lighting? That actually sounded like fun to me. After all, I’d only have to learn the basics once, and then I’d be able to leverage that skill for years to come.
Of course one option is to always shoot video outdoors in natural daylight, but I’d prefer a more controlled environment where I can practice and experiment more easily. That way I’d always have it set up to look good, and I could make spontaneous videos whenever I felt inspired to do so. If I make it easier to shoot videos with minimal friction, I’m more likely to do it.
As I recently shared in the News section, I’ve been doing a deep dive into learning about video lighting and setting up a home video studio in my home where I can experiment.
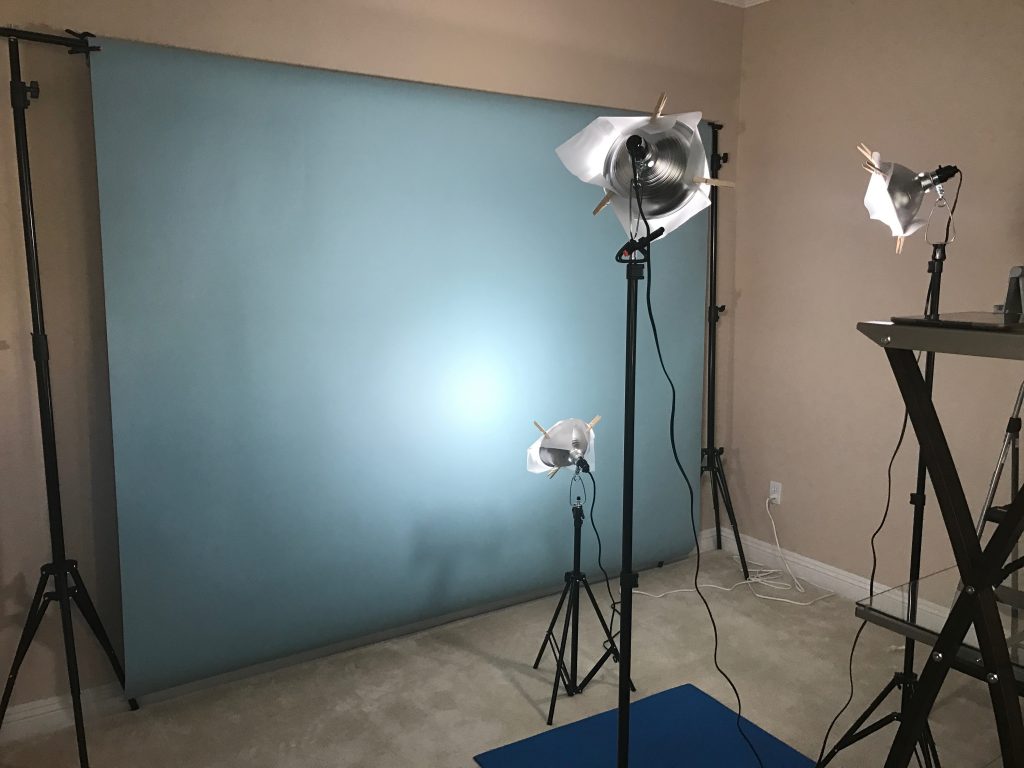
Here’s a pic of my DIY home video studio in progress. I took this photo last week, so I’ve tweaked it a bit since then, mainly by adding a fourth light, but this should give you some idea of how it looks so far.
Since I’m fairly new to creating videos, I didn’t want to spend a ton on this till I gain more experience and get a feel for which direction I want to go in the long run, so I put this together relatively quickly and inexpensively. I can always upgrade later. I think this was a good way to get started since it kept me from getting bogged down in endless research.
For the lighting I used:
- Three aluminum clamp lights from Lowe’s ($7.50 each)
- Cree 60W dimmable LED 5000K daylight bulbs ($15.50 for a 4-pack on Amazon)
- A frosted, medium-gauge shower curtain for the diffusion material used to soften the light, cut into pieces ($9 at Lowe’s)
- Wooden clothespins to clip the diffusion material onto the lights ($3 for a 50-pack at Lowe’s)
- Three CowboyStudio 7′ light stands (I bought 4 of them on Amazon since the 2-packs were about $23 each, so that’s about $11.50 per stand)
- Two 15′ extension cords ($3.50 each at Lowe’s)
I clamped the lights on top of the light stands and plugged all 3 lights into the extension cords and then into an outlet controlled by a light switch, so I can just flip the switch on the wall to turn on all the lights.
Here’s the shower curtain with parts of it cut out. It works great as inexpensive diffusion material to soften the lights without reducing the brightness too much. If I wanted to, I could also use colored materials to create different lighting effects.
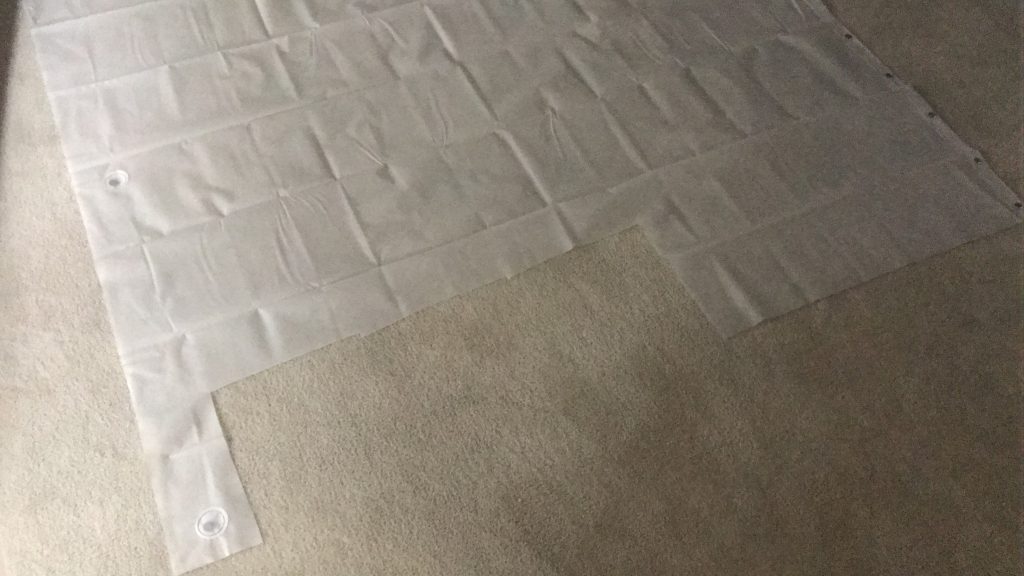
Here’s one of the clamp lights with the piece of shower curtain clipped onto it with clothespins. I clamped it onto the top of the light stand, which is adjustable up to 7 feet tall.

I’m using daylight bulbs (5000K with a color rendering index of 85+) since they create a more natural lighting effect. One mistake I made in the past was using warm lighting (around 2700K), which would make my face look too reddish.
Since I’m using LED lights, they stay cool even when they’ve been on for a while, and I don’t have to worry about the diffusion material melting. It doesn’t get hot standing in front of the lights either. It’s also nice that they don’t use much electricity – just 8.5 watts each.
I got dimmable bulbs (many LED lights are not dimmable), so I could add a dimmer switch later if I want more control over the brightness of the lighting. I can also swap in brighter bulbs. You can dim a light just by increasing its distance from the target, but sometimes it’s easier if you can change the brightness without moving the stands around.
For the backdrop I used:
- LimoStudio backdrop support system ($50 on Amazon)
- 9′ x 36′ roll of Savage background paper, Sky Blue ($70 on Amazon)
- Cheaplights spring clamps to clamp the backdrop roll at the top, so it doesn’t keep spinning down like a roll of toilet paper ($6.50 on Amazon for a 6-pack of clamps)
I considered a variety of options for the backdrop, and I received many suggestions from experienced friends. In the end I went with my intuition and got the Sky Blue background paper, and I’m glad I did. It goes nicely with my blue eyes, and it matches the color scheme of my website. I didn’t want to use pure white since that looks too corporate to me, and I prefer a more relaxed vibe. I can experiment with other colors later, and there are more sophisticated backdrop holders that can support multiple rolls of paper, but for now I’m pretty happy with how this one looks. It seems like a decent starting point.
I spent several hours experimenting with setting things up in different ways, including the lights’ distance from the backdrop, from me, and from each other; the height of the lights relative to my eyes; the angles of the lights; my distance from the backdrop; my distance from the camera; etc. There are many parameters to tweak, and sometimes seemingly minor changes can create stark differences. I learned that shadows can be a bit ornery sometimes, especially with a light-colored backdrop like this one, and I’m gradually learning how to tame them.
I started by trying some of the standard three-point lighting recommendations, but I didn’t like those results as much as what I figured out on my own through lots of trial and error. I learned a lot about how to create different effects just by testing different possibilities and seeing immediate results. I used my iPad’s front-facing camera to help me test. Whenever I made a change, I could see the results on the screen in real time.
Next I intend to make some throwaway videos to get a sense of what works well and what doesn’t. I’m very comfortable speaking in front of a live audience, and I enjoyed podcasting when I did that too, but I’m inexperienced doing solo video. I want to reach the point where I can communicate on video and have it feel light, relaxed, and fun. Now that I’m actively working on my biggest weakness in this area, I’m looking forward to making faster progress here.
I am still a novice at this, and I’m sure I’ll make some mistakes, but this gets the ball rolling.
I did have one mishap. While putting away an extra light bulb in a high cabinet, I accidentally banged the top of my head really hard on the bottom corner of the cabinet door. Fortunately the cut wasn’t too deep, and I got the bleeding stopped with some direct pressure. When this happened my first thought was Owwww!!! But my second thought was, Thank goodness I smashed my head where the hair is and not on my forehead! I can still make videos! 🙂
Then again, I’d probably start creating and posting videos even with a gash on my face.
Diving Into Action
A deep dive involves lots of action. Once you’re in full immersion mode, it’s important to keep the momentum going, especially if your goal is to turn a weakness into a strength.
To continue my own deep dive here, I’d love to create a short video series on a personal growth topic, so I can gain some video production experience quickly, help you move the needle forward in your life, and get some feedback on the results. If you have any suggestions or ideas for what you’d like to see and how I can help you, please let me know. What are your biggest problems or challenges in life right now? In which area of your life do you most want to make faster progress?